Squarespace Invoicing 2026: How to Create a Client Invoice

Can you send invoices through Squarespace? Yes, you can!
Rather than spending money on invoicing software, you can create, send, and manage invoices directly through your Squarespace site. How awesome is that?
Here’s how to send Squarespace invoices to your clients.
Squarespace invoicing in 4 easy steps
Step 1: Access the Squarespace invoicing panel
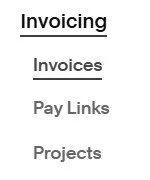
Go to the Squarespace website you want to send an invoice from and click on Invoicing in the main menu.

If Invoicing isn’t visible, you can add it to your menu by clicking on the Customize Sidebar icon at the bottom of the main menu and turning Invoicing on.

Step 2: Create your invoice
Click on Invoice in the Invoicing menu. You can also click on the black Create button and create an invoice there.

Choose the client you want to send an invoice to. You can choose an existing client you’ve already worked with (or who has filled in a contact for on your site) or add a new one.
Step 3: Edit and send your invoice
The next step is to edit your Squarespace invoice.

From here you can:
Change the name of and memo note on your invoice
Choose when to send your invoice (you can send it immediately or schedule it to go out at a specific time)
Change the due date of the invoice
Add items to your invoice
Add a discount
You can also access global settings, where you can change the style of your invoice and what appears in your footer (for example, your business address and tax ID.)
When you’re done, click send, and your invoice will be sent to your client.
There will be a Pay Now button on the invoice that they can click to make payment. You’ll get an email notification when they pay.
(If you haven’t already, you will need to connect a payment processor to your website before you can accept payment. Here’s how to connect PayPal and Stripe.)
Important note: You can only edit an invoice before you send it to a client. If you edit an invoice that has already been sent to a client, it will be automatically cancelled and a new one created with the changes you’ve made.
Step 4: Manage your invoice
If you go to the Invoices sub-menu, you can see a list of all the invoices you’ve sent.
In this menu, you can:
Filter invoices by status and date sent
Send a reminder email (you can also set up automated reminders, keep reading to find out how to do this)
Edit an invoice (bear in mind that you can’t edit an invoice number or reassign an invoice to another client)
Resend an invoice
Mark an invoice as paid
Wholly or partially refund an invoice
Delete an invoice that’s still in drafts
Duplicate an invoice
Cancel an invoice
Squarespace invoicing: Frequently asked questions
Is it free to send Squarespace invoices?
You don’t have to pay to use Squarespace’s invoicing tools, and there are no transaction fees for sending an invoice.
However, your payments are subject to payment processing fees—which vary depending on the payment processor you use and the country you’re in.
Can I send Squarespace invoices through the Squarespace app?

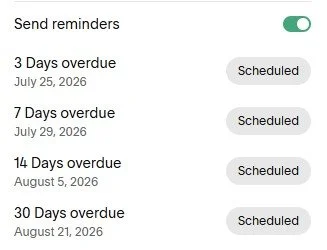
Yes. You can send reminder emails manually, but you can send automated reminders too, which is ideal if you have a lot of pending payments due!
To set this up, click Edit on the relevant invoice and switch the toggle on beside Send reminders. Emails are sent 3, 7, 14, and 30 days past due, and stop after the client pays the invoice.
Can I mark a Squarespace invoice as paid if I receive cash or a check?
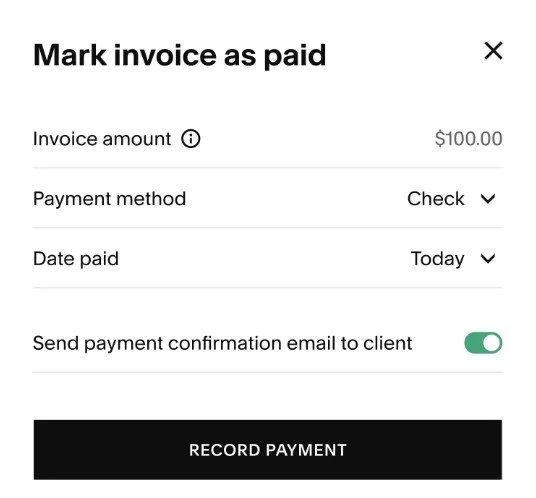
Yes!
You can manually mark your invoices as paid if your client doesn’t use the payment link, and send them a confirmation email.
Is there an alternative to sending an invoice through Squarespace?

Yes—you can set up a Pay Link that you can send to customers by email, text, social media, or QR code.
Pay Links are ideal if you want an informal, fast alternative to sending an invoice for products or services. You can use them for accepting donations and tips too!
The number of active Pay Links you can set up depends on your website plan.
If you’re on the Basic plan you can have one, if you’re on the Core plan you can have five, and if you’re on the Plus or Advanced plan, you can have as many as you need.
You also need to connect a payment processor if you haven’t already.
Here’s how to set a Pay Link up:
Go to the Invoicing menu and select Pay Links
Click CREATE PAY LINK
Fill in your Pay Link, including:
The title
The amount. You can also set a flexible or a minimum/maximum amount, meaning customers can choose what to pay
The item name
The item type (either a physical product or a service)
Taxes if applicable
An optional image
When you’re done, click SAVE AND SHARE. Squarespace will generate a unique URL you can share with customers
You can track your Pay Links in the invoices panel, including how many times a link has been used and how often customers have made payment.
Are there other options if I don’t want to use Squarespace’s invoicing tools?
Yes—you can integrate accounting tools into your Squarespace site if you’d prefer to use an alternative invoicing provider.
Both Xero and QuickBooks have their own free Squarespace extensions.

There you have it, Squarespace invoicing in four simple steps. Give it a try today!