How to Add a Live Chat Plugin to Your Squarespace Website
When you sell products or services online, it’s essential to offer an exceptional customer experience.
Speed is of the essence when answering your customers’ questions. In fact, studies show that the faster you can reply, the more likely prospective customers are to convert!
Adding live chat to your website can be a great way to respond quickly to your customers while they’re checking out your site. And the good news is, you can add a nifty live chat plugin to your website, code-free, with Spark Plugin.
This clever little plugin redirects customers to your business’s WhatsApp Messenger and/or Facebook Messenger, and also gives them the option to send you an email.
Keep reading to discover how to add live chat to Squarespace using Spark Plugin, in just three easy steps!
The takeaway:
The Spark Plugin live chat plugin lets customers contact you through Facebook Messenger, WhatsApp, and email
It comes with your Spark Plugin subscription, alongside over 100+ other customizations
You can customize the plugin to suit your needs, as well as change the color to match your branding
If you can’t add Spark Plugin to your site, there are lots of alternative live chat plugins you can use
How to add live chat to your Squarespace site in 3 simple steps
To make the most of the Spark Plugin live chat functionality, we recommend setting up the following if you haven’t already:
A Facebook page with Facebook Messenger enabled
A WhatsApp account for the phone number you want customers to contact you on
An email address that you’re happy for customers to contact you on
Got all these? Let’s get started!
Step #1: Add Spark Plugin to your website
If you have already added Spark Plugin to your site, you can skip this step.
When you sign up for Spark Plugin, you’ll receive a short snippet of code.

Go to Website, Website Tools, and Code Injection, paste the code snippet into the header box and click Save.

You’ll then see a small pink ‘K’ icon in the top-right-hand corner of your Squarespace site. If you can’t, log out of your site and sign back in again.
Step #2: Enable the Squarespace live chat plugin
Click on the small pink ‘K’ to access the Spark Plugin menu. The Squarespace live chat plugin is universal, so you can do this from any page on your site.
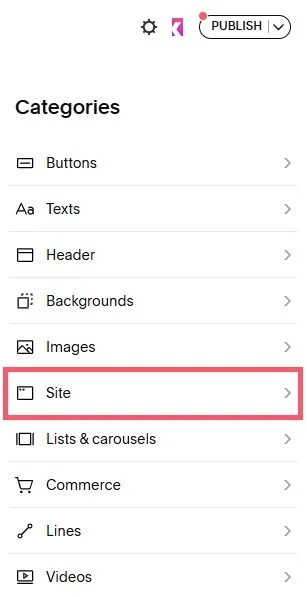
Select Site from the main menu.

Scroll to Live Chat and toggle it from off to on.

A circle with a speech bubble in it will appear in the bottom right corner of your webpage.
Step #3: Customize live chat
Before you can start using your Squarespace live chat plugin, you need to customize it and set up your channels of communication. Let’s run through all the different options:
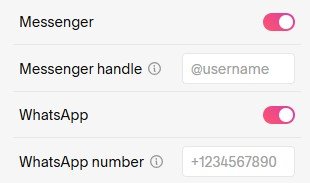
Messenger: Toggle this from off to on if you want your customers to be able to contact you through your Facebook Messenger account.
Messenger handle: Add the name of your Facebook page. You can get this from the URL of your page, for example, ours would be Spark-Plugin.
WhatsApp: Toggle this from off to on if you want your customers to be able to contact you through a phone number linked to WhatsApp.
WhatsApp number: Add your WhatsApp number here. Make sure it’s preceded by a plus sign (+) and your country code.
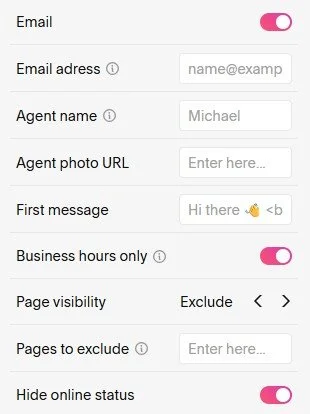
Email: Toggle this from off to on if you want to include an email address for customers to contact you on. When they click this in your live chat plugin, it will automatically open their email client of choice.
Email address: Enter the email address you want to use.
Agent name: Enter the name of the person who will be handling the live chat.
Agent photo URL: If you’d like to use a photo of the person handling the live chat, enter a link to their photo here. Their name and photo will appear at the top of the chat.
First message: Enter the message you want to greet customers with when they open the chat. You can use emojis and basic HTML if you want to style it.
Business hours only: Toggle this from off to on if you only want your live chat plugin to appear between 9am and 5pm, Monday to Friday.
(There isn’t a way of changing these days and times at the moment, but we’ll let you know if this changes!)
Page visibility: Your live chat plugin will appear on all pages of your website by default, but here you can set it to only show on certain pages, or not show on selected pages.
Choose Include or Exclude, and enter the URL slugs of the pages, separated by commas.
Hide online status: Your chat plugin will say whether you’re online or offline. You can hide this by toggling this from off to on.
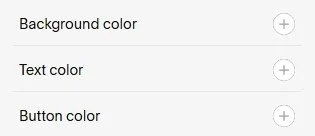
Background color: Change the background color of your live chat plugin.
Text color: Change the text color of your live chat plugin (make sure there’s good contrast for accessibility!)
Button color: Change the color of the buttons of your live chat plugin.
Before you set your Squarespace live chat plugin live, we recommend running a final check to make sure it points customers to the right communication channels. Then, you’re ready to launch!
Squarespace live chat plugin: Frequently asked questions
What is live chat?
Live chat functionality on your website lets customers interact with your business in real time.
You can use it to answer customer questions while they’re on your website, increasing the chances of them buying from your business.
Is it free to add a Squarespace live chat plugin to my website?
You can get this live chat plugin through Spark Plugin, which costs from just $9 a month.
There are over 100 other customizations you can use, and there’s a free 14-day trial so you can see if it’s right for you first!
Are there any other options if I can’t use Spark Plugin?
Yes, there are lots of different live chat plugins you can add to your website.
We cover some of the best Squarespace chatbot plugins (live chat which uses AI to answer customer questions) on our blog.
And there you have it—how to add a live chat plugin to Squarespace. Why not give it a try today?
Spark Plugin has over 100 amazing customizations that will transform the look and feel of your Squarespace site. For example, you can add a loading screen to your pages, or a stunning scrolling logo carousel!