How to Add a Loading Screen in Squarespace (The Easy Way)
A high-quality user experience (UX) makes a real difference when you’re building a website.
Not only does it keep prospective customers on your site, increasing the chances of them converting, but it can potentially boost your search engine rankings too!
One easy way you can improve the UX on your website is by adding a loading screen. And the good news is that you can easily add one to your Squarespace site in just a few clicks with Spark Plugin.

Here’s how to add an animated loading screen to your Squarespace website in three simple steps.
The takeaway:
A loading screen is a temporary page on your website which appears while your main content is loading, helping to manage visitor expectations
Spark Plugin offers a Squarespace loading screen customization you can use to add a loading screen to your website
You can customize your loading screen, for example, by adding a colored background or a transitional animation
Alternatively you can also use custom code to add a loading screen to your website, but this is harder to do
How to add a Squarespace loading screen to your website
Step #1: Install Spark Plugin
(If you already have Spark Plugin on your website, you can skip this step!)
When you sign up for Spark Plugin, you’ll receive a short snippet of code that’s unique to you.

Go to Website, Website Tools, and Code Injection, and paste the snippet of code into the header box. Click SAVE when you’re done.

You’ll see a small pink ‘K’ icon in the top right-hand corner of your Squarespace site. If you can’t see it, log out of your site and log in again.
Step #2: Add your loading screen to your site
Click on the ‘K’ icon to access the Spark Plugin customization menu.
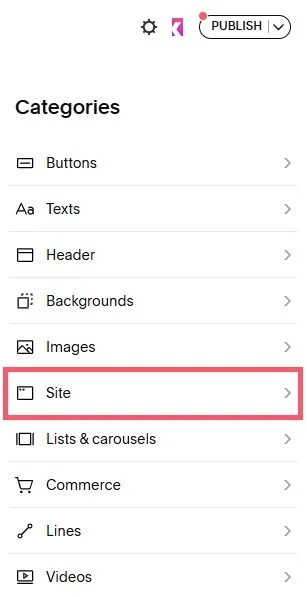
Choose Site.
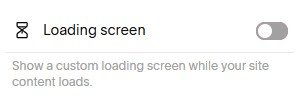
Scroll down to Loading screen and toggle it from off to on.
Your default loading screen will appear to show you that it’s now operational.
If you want to turn your animated loading screen off at any point, just toggle it from on to off.
Step #3: Customize your loading screen
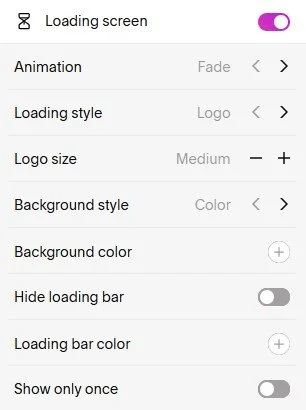
There are lots of different options to customize your loading screen so it matches your brand identity and style.
Your loading screen will appear when you toggle through the customizations so you can see how the changes you have made affect it.
Let’s run through them all:
Animation. Choose from three loading screen animations:
Fade
Mask up
Mask down
Loading style. Choose what displays on your loading screen page:
A logo (this will be the logo you have uploaded to your site header)
Text
Text. If you’ve chosen text, enter the text of your choice here. You can also choose the color by selecting a swatch or entering a hex code
Logo or font size. Choose the size of your logo (small, medium, or large) or font (in pixels)
Background style. Choose from:
Color (you will have the option to choose the color by selecting a swatch or entering a hex code)
Image (if you choose this option, enter the URL of the image you want to use)
Glass (this option adds a translucent overlay to your loading screen. You can also choose a color for the overlay)
Hide loading bar. A loading bar appears on the loading page by default to show visitors when they can expect to see your content. If you want to hide it, toggle this option to on
Loading bar color. If your loading bar is on, this setting lets you choose the color by selecting a swatch or entering a hex code
Show only once. Your loading bar appears on every page your visitor accesses by default. If you only want to show it on the first page they access, toggle this option to on
Experiment with the settings and try different combinations until you create the perfect Squarespace loading screen!
Squarespace loading animation: Frequently asked questions
What is a loading screen?
A loading screen on a website is a temporary page which is shown while your main content loads in the background.
What are the benefits of a loading screen?
A loading screen boosts the user experience (UX) on your website, keeping visitors happy and reducing the chances of them leaving your site.
It shows them that something is happening, and makes wait times feel shorter by keeping them entertained.
Can I have different loading pages on my website?
Unfortunately not. This is for the best though; multiple different loading pages may look messy and confuse your web visitors!
What are the best practices for creating a Squarespace loading screen?
Use your brand colors for consistency
Keep it as simple as possible so you don’t frustrate or confuse visitors
If you add text, make sure it’s easy to scan and understand, as your loading screen may only be up for a few seconds
Test your loading screen on both desktop and mobile to make sure it looks good
If I don’t have Spark Plugin, can I add a loading screen to my site?
You can, but you will need to know custom code to do this.
This is risky as adding custom code can potentially break your website, and if Squarespace updates, your loading screen may no longer work.
Spark Plugin is code-free, and updates with your website, providing you with peace of mind that your loading screen will always work.
Now you know how to add a Squarespace loading screen to your website using Spark Plugin!
Why not take advantage of a free 14-day trial and try creating one for your site?